Ethereum Configuration
Ethereum is a decentralized blockchain platform that enables smart contracts and decentralized applications (dApps). It is one of the most popular blockchain platforms, supporting a wide range of applications from DeFi to NFTs. Ethereum uses a proof-of-stake consensus mechanism and provides a robust ecosystem for developers to build and deploy smart contracts.
In this chapter, you will learn how to configure and use Ethereum, including setting up blockchain providers and other operations, to help you quickly get started and apply the features of the Ethereum platform.
1. Configuration field description
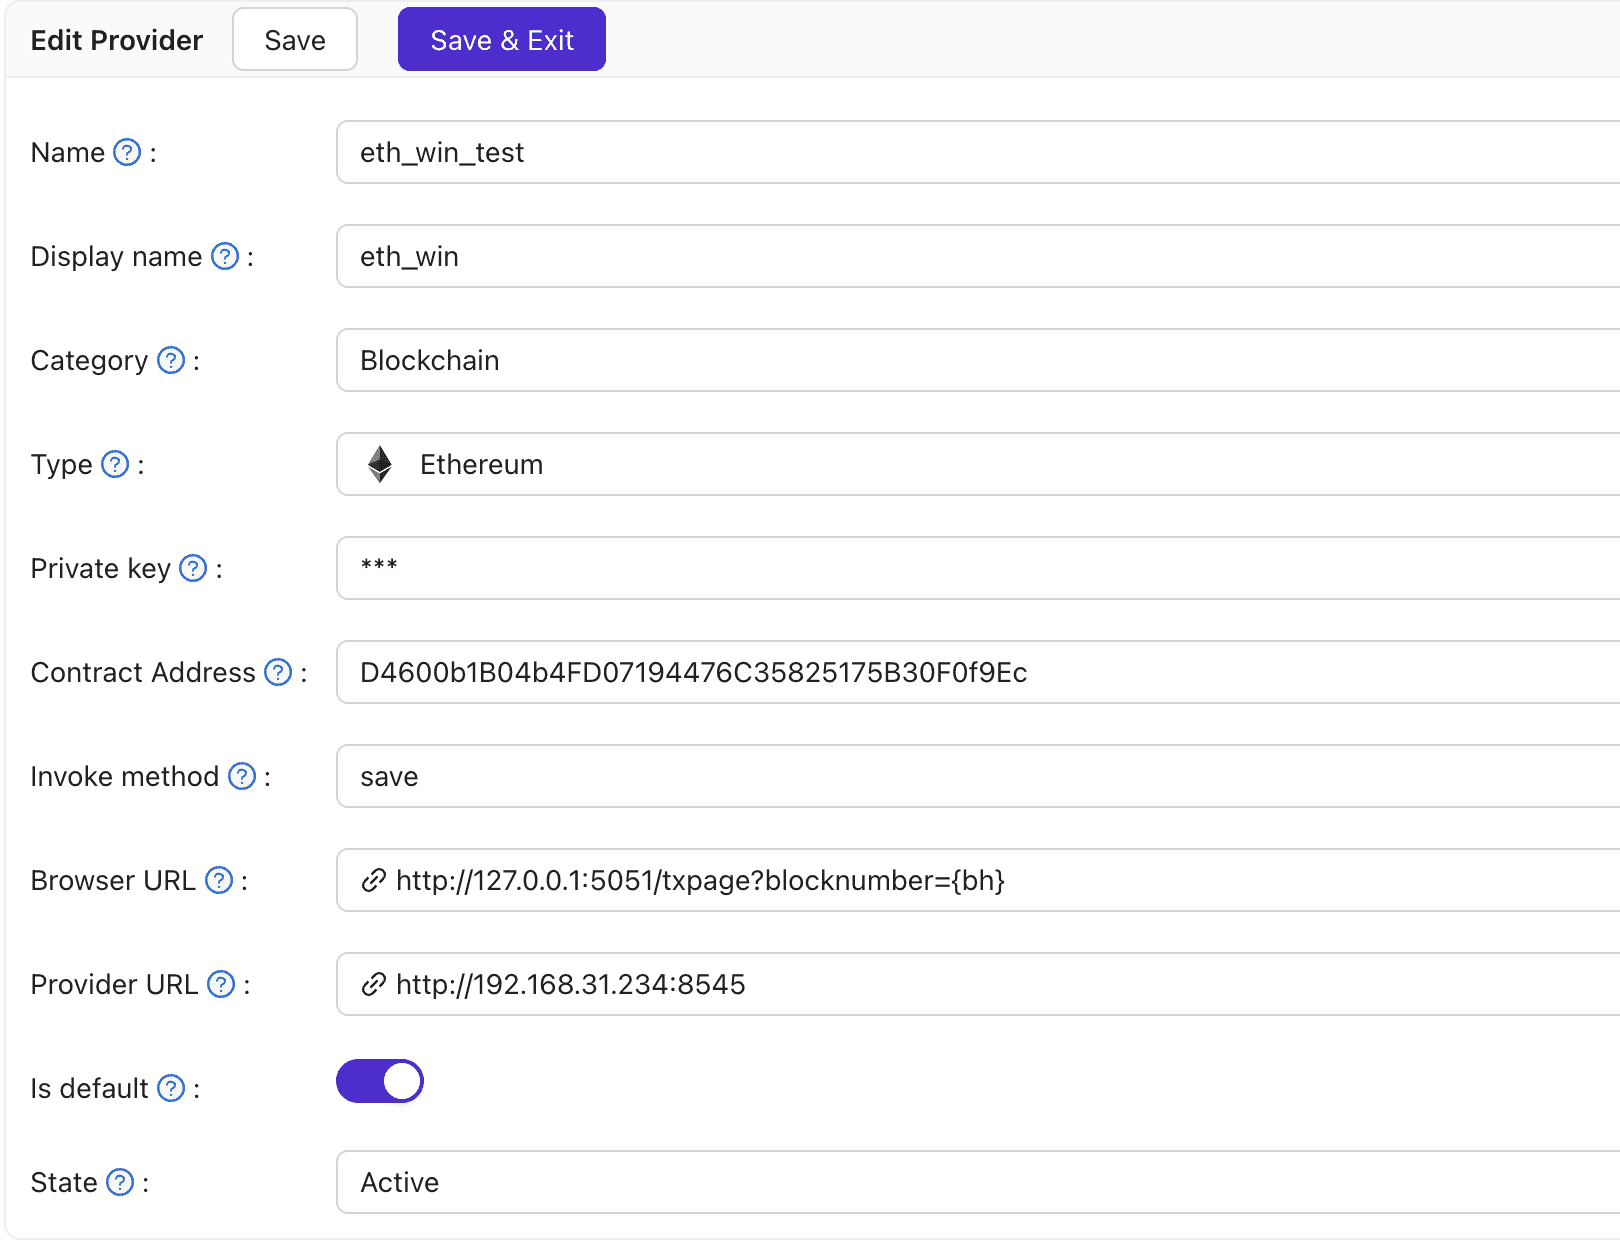
When configuring an Ethereum provider in Casibase, you need to fill in several key fields. Each field has a specific meaning and is required for the correct integration with the Ethereum blockchain.
Field Descriptions:
Name: The unique identifier for this blockchain provider.Display name: The display name shown in the UI for this provider.Category: The type of service, here it should beBlockchain.Type: The blockchain type, here it should beEthereum.Private key: The private key of the Ethereum account used for signing transactions.Contract Address: The address of the smart contract to interact with on the Ethereum blockchain.Invoke method: The method name to invoke on the smart contract.Browser URL: The URL for viewing the blockchain in a browser, with block number template support.- Format:
http://127.0.0.1:5051/txpage?blocknumber={bh}where{bh}will be replaced with the actual block number when visiting the block.
- Format:
Provider URL: The JSON-RPC endpoint URL for connecting to the Ethereum network (e.g., Geth, Ganache, or other node).
Please make sure to fill in each field accurately according to your Ethereum deployment information. This will ensure that Casibase can successfully connect and interact with your Ethereum blockchain.
2. Configure Ethereum
Example
2.1 Provider URL Configuration
The Provider URL is the JSON-RPC endpoint that Casibase will use to communicate with the Ethereum network. This is the first and most important configuration as it establishes the connection to your Ethereum network.
Example Provider URL
http://127.0.0.1:8545
You can use:
- geth: A popular Ethereum client that provides a JSON-RPC interface.
- ganache: A personal blockchain for Ethereum development that can be used for testing and development purposes.
- other: Ethereum JSON-RPC compatible chains. Any other Ethereum-compatible chain that supports the JSON-RPC interface.
Example: Geth Dev Mode
To quickly experiment with Ethereum using Geth, you can start Geth in developer mode. This mode launches a local Ethereum node with instant mining and pre-funded accounts, making it ideal for testing and development.
geth --dev --http --http.api eth,web3,net --http.corsdomain "https://remix.ethereum.org"
This command starts a local Ethereum node with HTTP JSON-RPC enabled and sets the CORS domain to allow cross-origin requests from https://remix.ethereum.org. This configuration is suitable for online contract deployment and interaction using Remix web-based tools. You can use the default account (private key can be found in the geth console at first launch) and the endpoint (http://127.0.0.1:8545) as your Provider URL in Casibase for immediate testing and development.
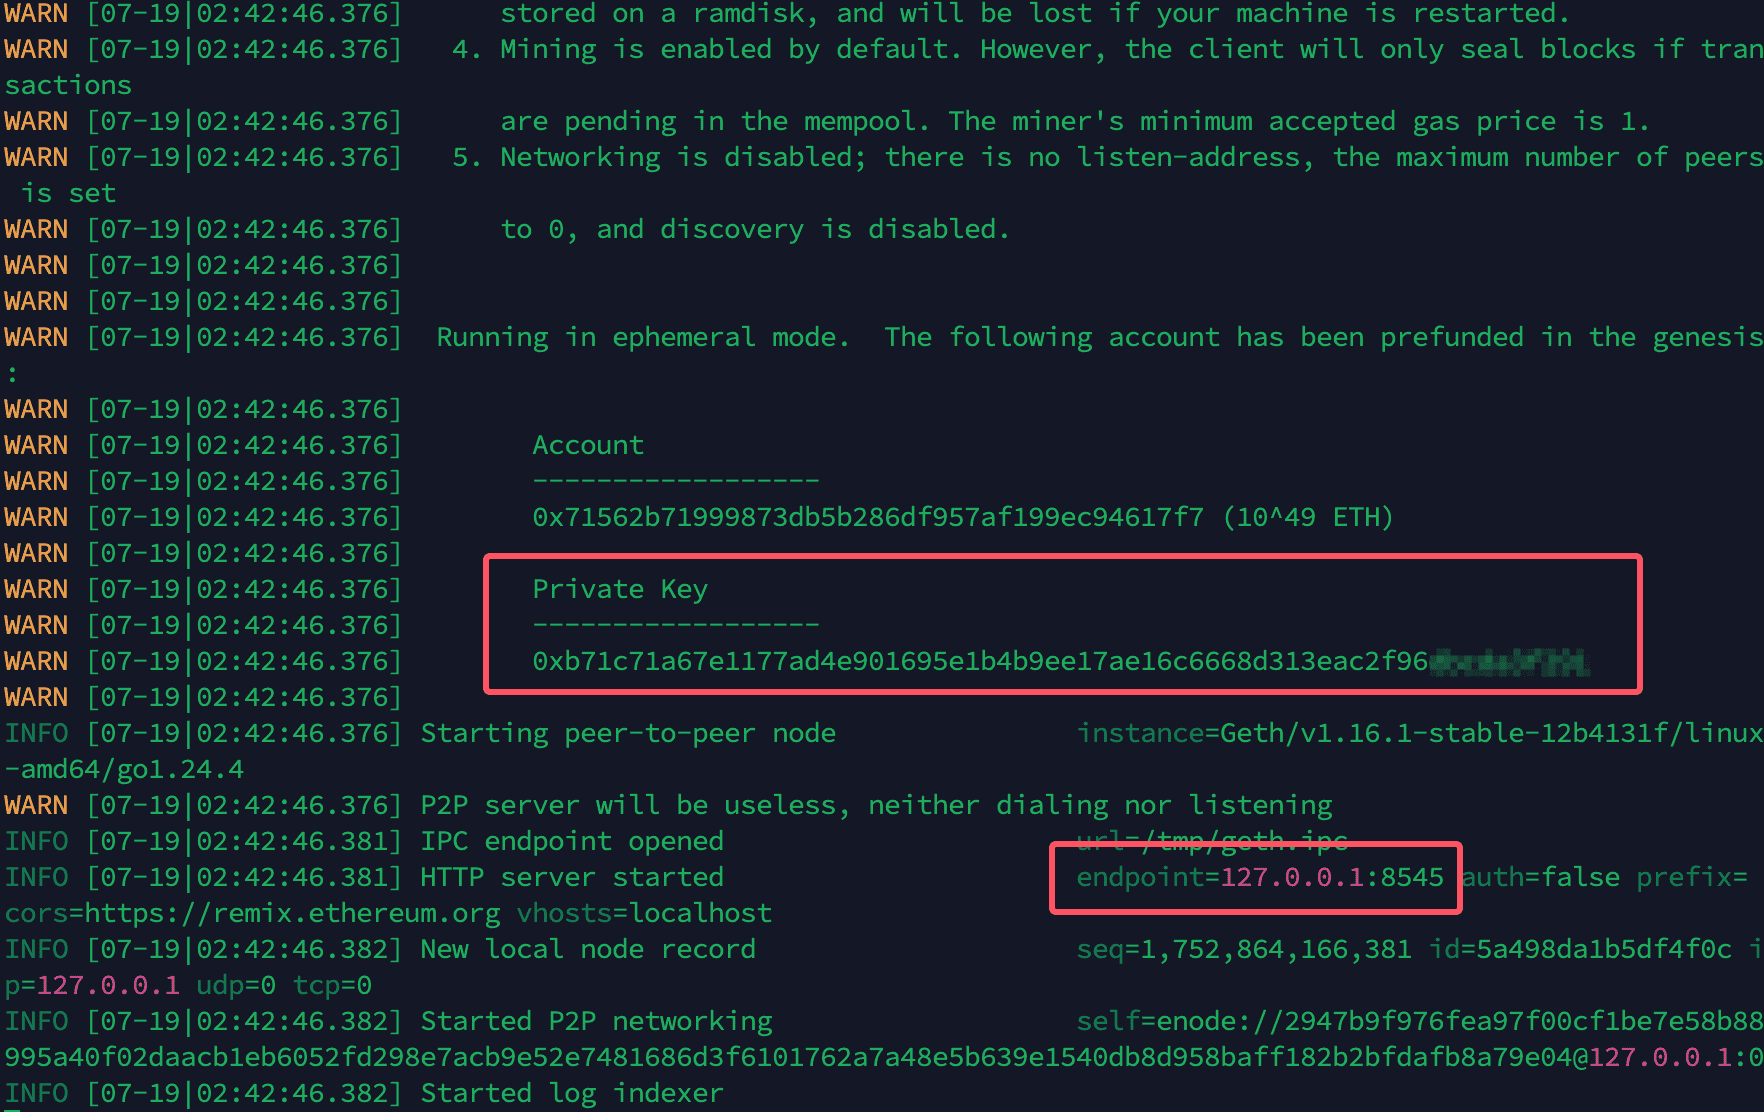
Understanding the Console Output:
When you run Geth in dev mode, the console will display important information as shown in the image above:
- Private Key: The console shows the private key of the pre-funded account that you can use for testing. This key is automatically generated and displayed in the console output.
- HTTP Endpoint: The console confirms that the HTTP JSON-RPC server is running on
http://127.0.0.1:8545. This is the endpoint address you should use as your Provider URL in Casibase. - Account Address: The corresponding Ethereum address for the generated private key is also displayed.
Important: Copy and save these values immediately as they are essential for configuring your Casibase provider. The private key will be needed for the Private key field, and the HTTP endpoint will be your Provider URL.
For more details, see the Geth Dev Mode documentation.
2.2 Private key Configuration
The private key is essential for signing transactions on the Ethereum blockchain.
The private key should be provided without the hexadecimal prefix 0x.
Example Private Key
# Example private key in geth dev mode (without 0x prefix)
b71c71a67e1177ad4e901695e1b4b9ee17ae16c6668d313eac2f96dbcda3f291
This is just an example private key for demonstration purposes. Never use this key in production or for real funds!
You can obtain your private key from various sources:
- Initially generated by Geth: When you start Geth in
devmode, it generates a pre-funded account with a private key displayed in the console. - Ethereum Clients: Generate a new account using Ethereum clients like Geth.
Casibase will use *** to replace the private key on the frontend after the submission.
2.3 Invoke Method and Contract Address Configuration
Invoke Method Configuration
The invoke method is the specific function name in the smart contract that you want to call.
In Casibase, your smart contract should implement specific methods to ensure compatibility:
save: This method is used to store data in the contract. It should accept parameters as a tuple (struct).struct DataItem {
string key;
string field;
string value;
}
// Define event, returns key, field, value in order
event DataSaved(string key, string field, string value);
// Save struct data and emit an event for tracking
function save(DataItem memory _data) public {
emit DataSaved(_data.key, _data.field, _data.value);
}Method name
savecan be customized, but it should accept a struct as an argument.
You can refer to the Example to see how to implement the save method in your smart contract.
Make sure your contract includes these methods to enable seamless integration with Casibase.
Contract Address Configuration
# Example contract address (without 0x prefix)
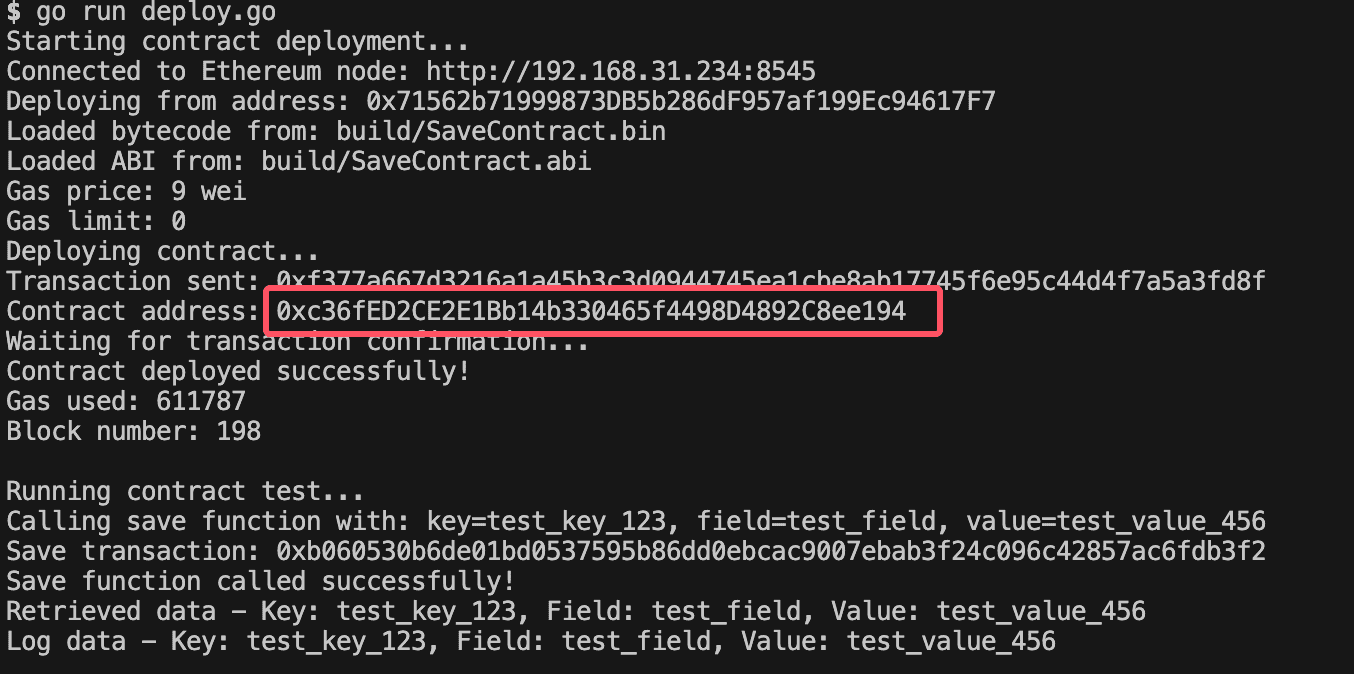
c36fED2CE2E1Bb14b330465f4498D4892C8ee194
The contract address is the deployed smart contract's address on the Ethereum blockchain. You can obtain the contract address after deploying a smart contract.
Example for Contract Deployment Reference
To deploy a smart contract on Ethereum, you can refer to the Casibase/contract-storage-eth. This repository provides sample Solidity contracts and deployment scripts using Go and Remix.
Getting Started with the Repository:
- Get Example Code: Clone or download the repository to access sample Solidity contracts and deployment scripts.
- Contract Compilation: Pre-compiled contract artifacts (ABI and bytecode) are available in the releases section of the repository.
- Setup for Go Script Deployment: If using the Go deployment script, download the contract artifacts from releases and place them in the
build/folder within the Go script's working directory. - Deployment Options: You can deploy the contract using either:
- Go Script: Use the provided Go deployment script in the repository for programmatic deployment (requires contract artifacts in
build/folder) - Remix IDE: Deploy contracts online using Remix with the contract source code
- Go Script: Use the provided Go deployment script in the repository for programmatic deployment (requires contract artifacts in
After deployment using either method, you can obtain the contract address from the deployment output.
Use the go script in the reference to deploy the contract
Or you can use the block explorer to find the contract address.
2.4 Browser URL Configuration
The Browser URL lets you view specific blockchain blocks and transactions in a web browser. By using a template with the {bh} placeholder, Casibase can automatically redirect you to the corresponding block details in your chosen blockchain explorer.
http://127.0.0.1:5051/txpage?blocknumber={bh}
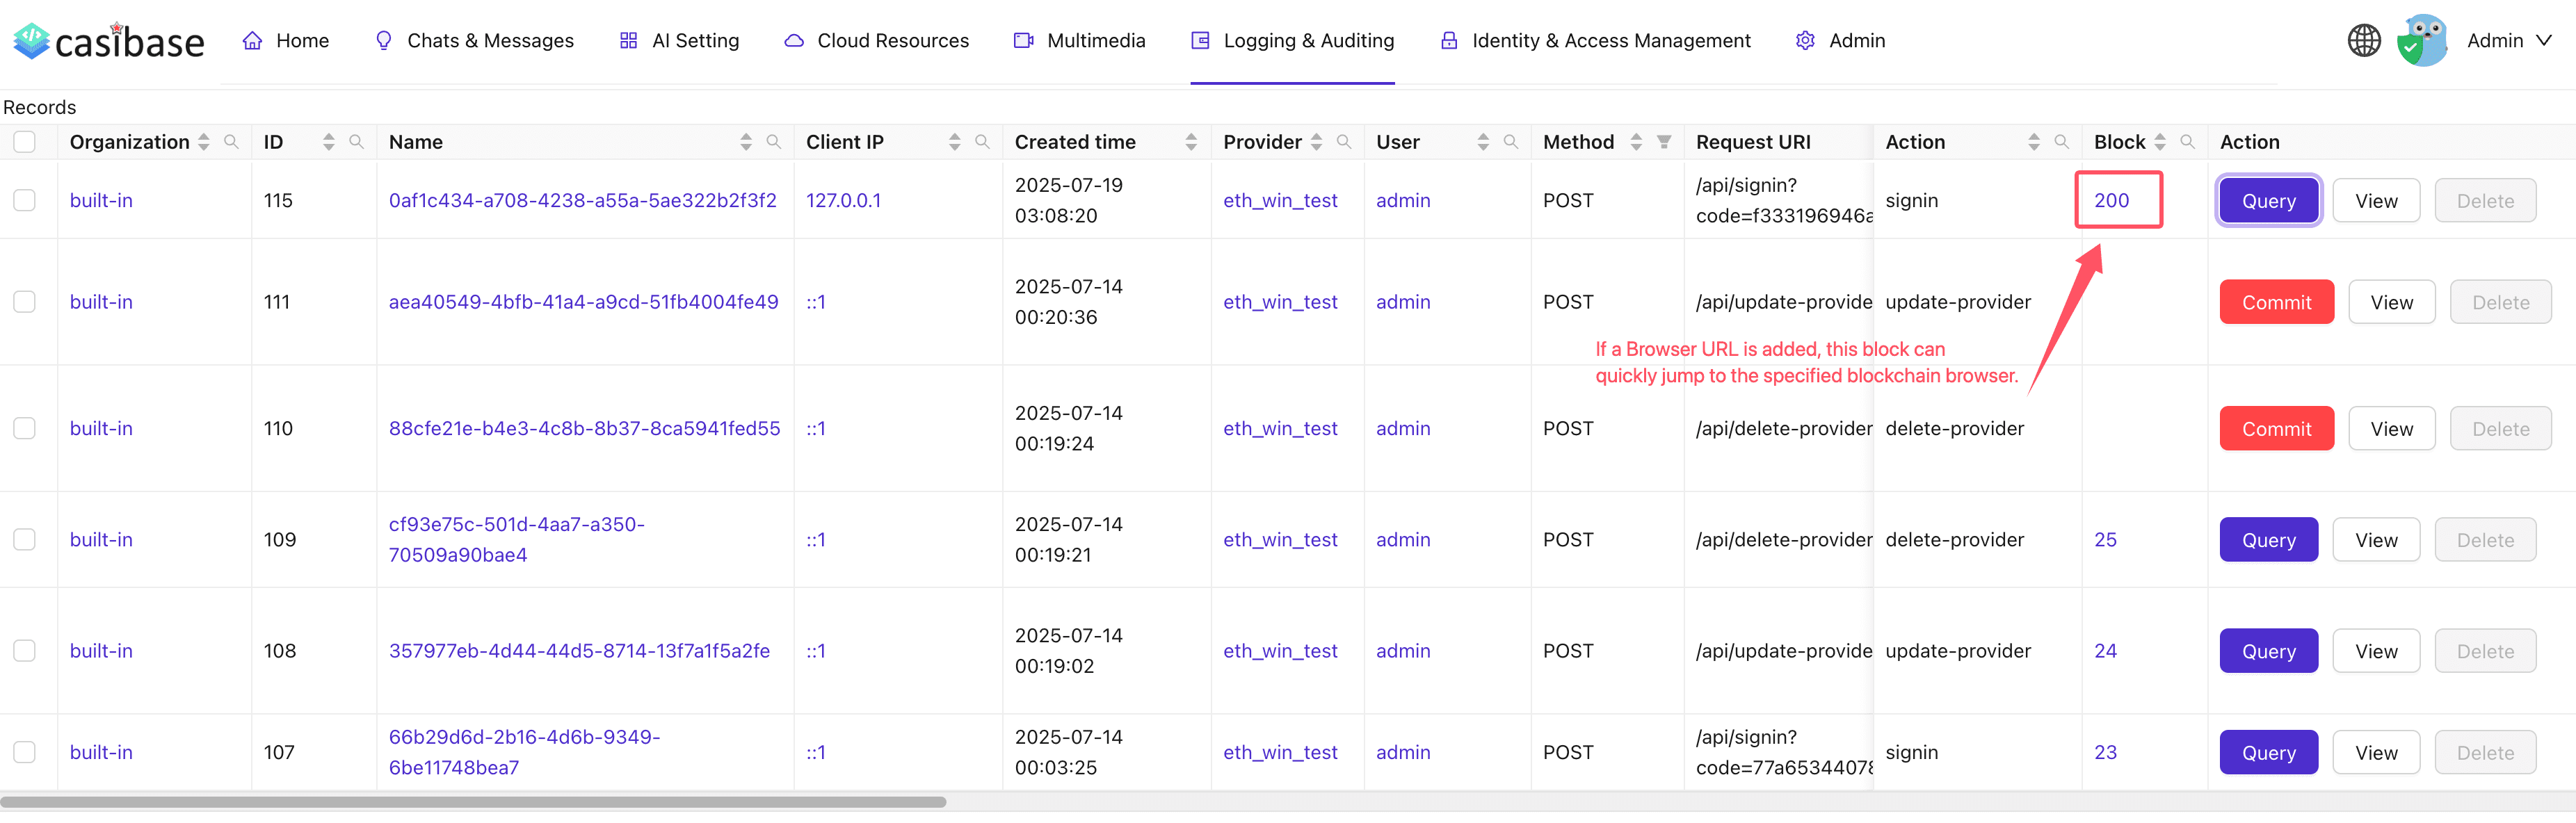
When you use the {bh} placeholder in the Browser URL template, Casibase will replace it with the actual block number and allow you to jump directly to the relevant block information in your blockchain explorer.
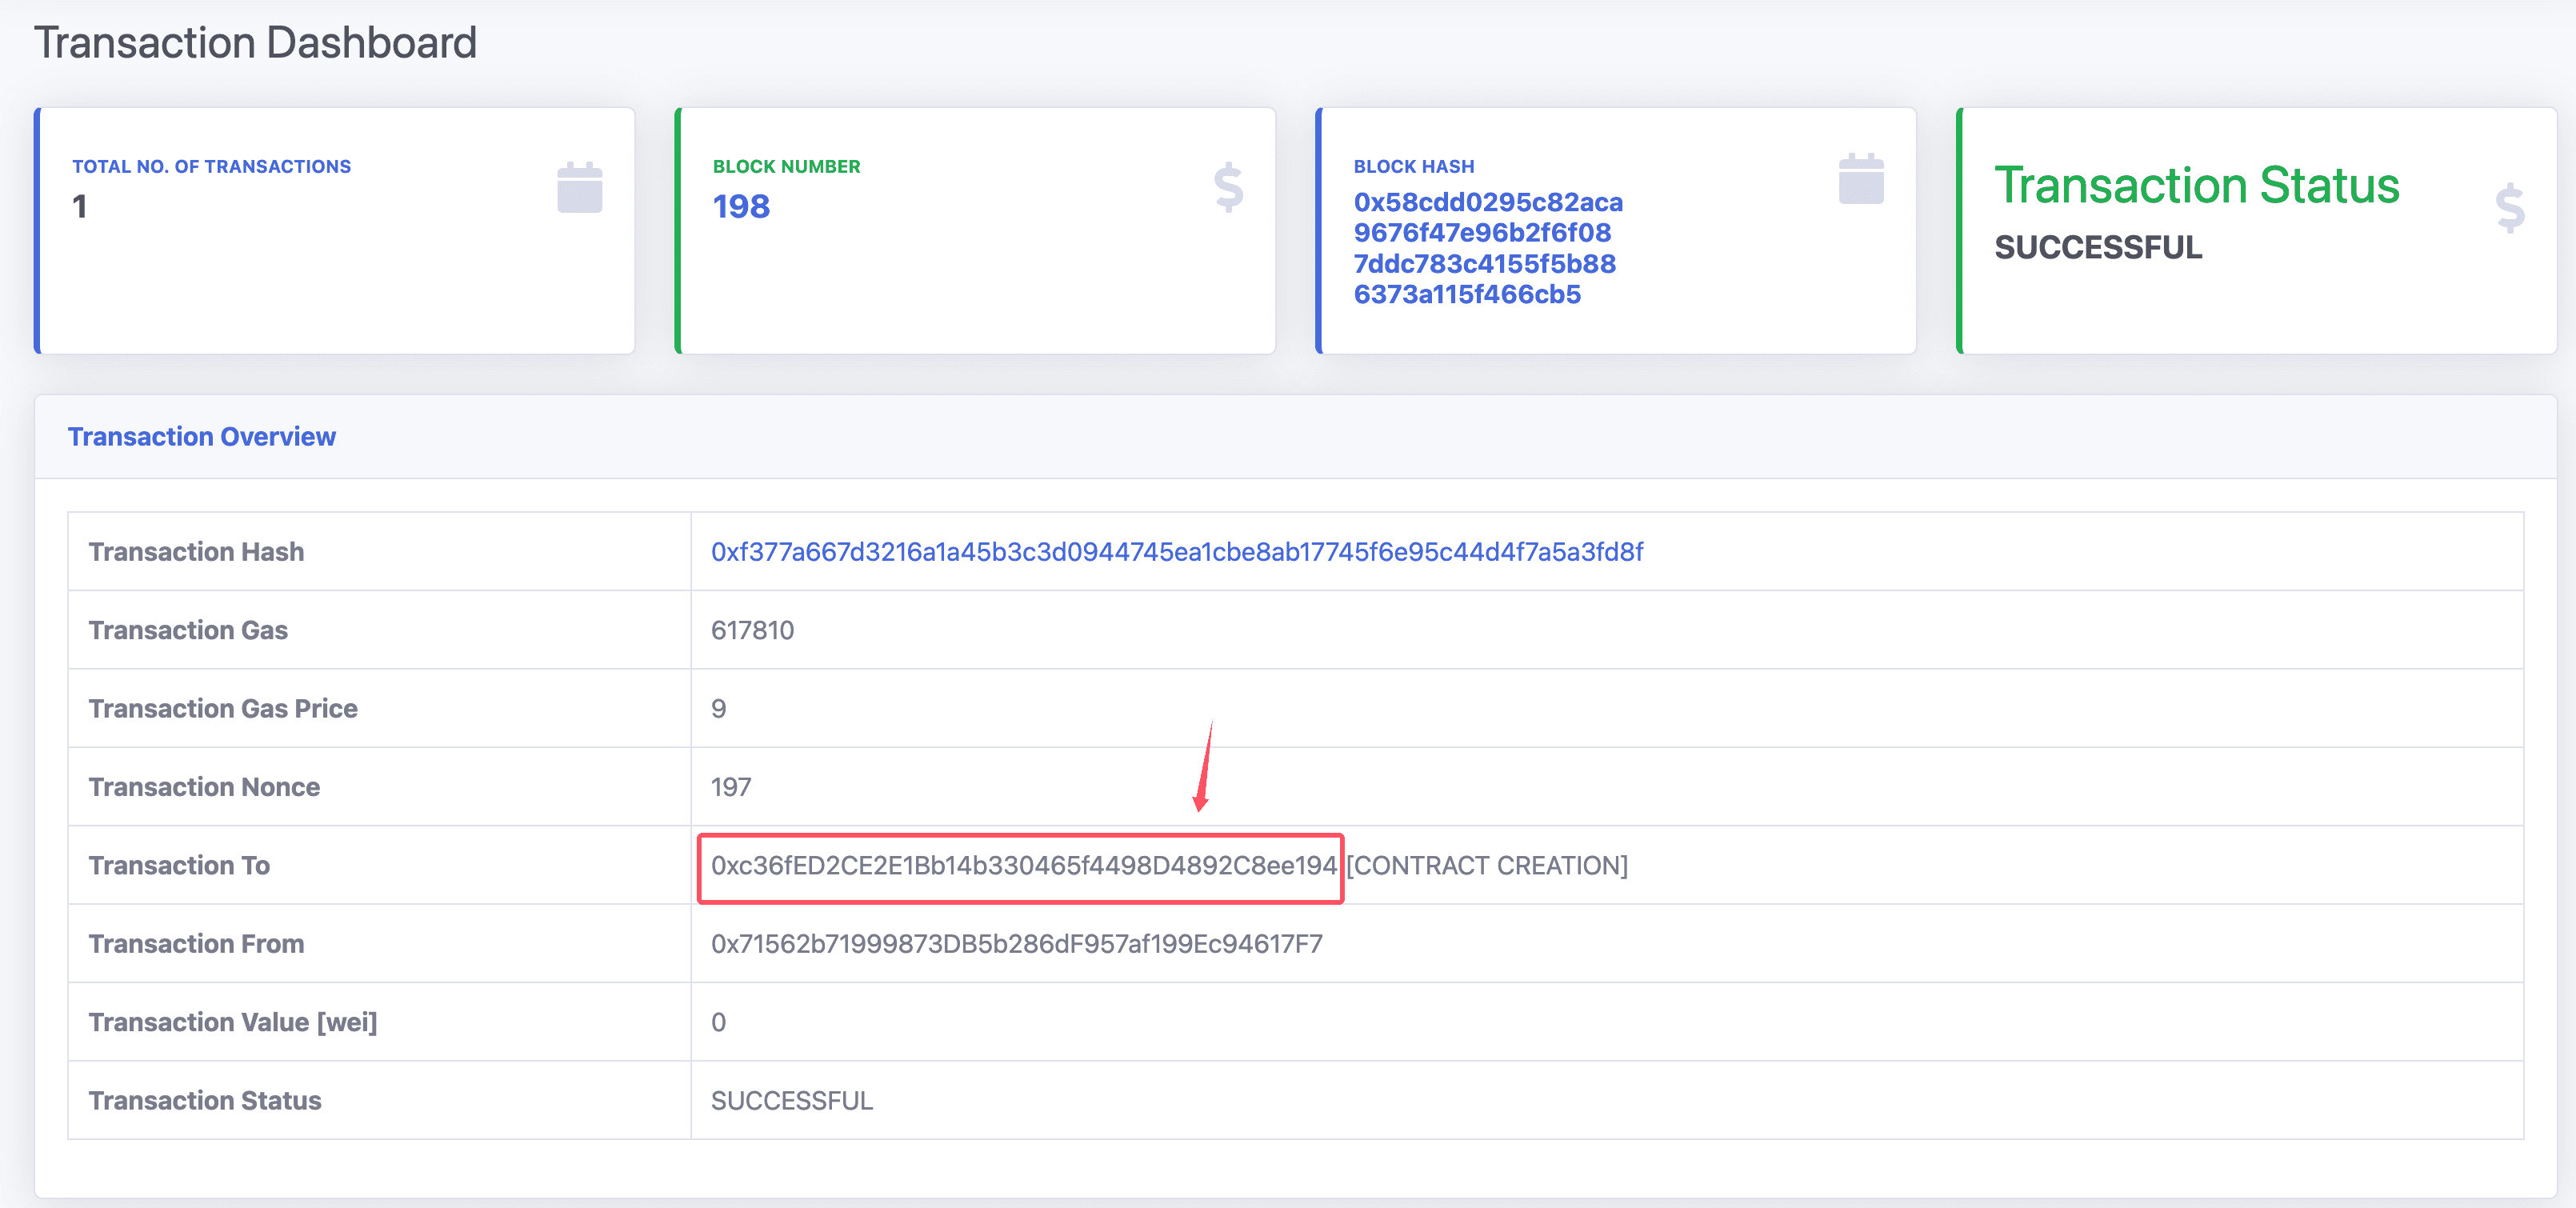
Example: Ganache CLI Block Explorer
To quickly view Ethereum blocks and transactions, you can use the open-source blockchain explorer casibase/ganache-cli-block-explorer. This tool provides a simple web interface for browsing blocks, transactions, and contract events on your local Ethereum node.
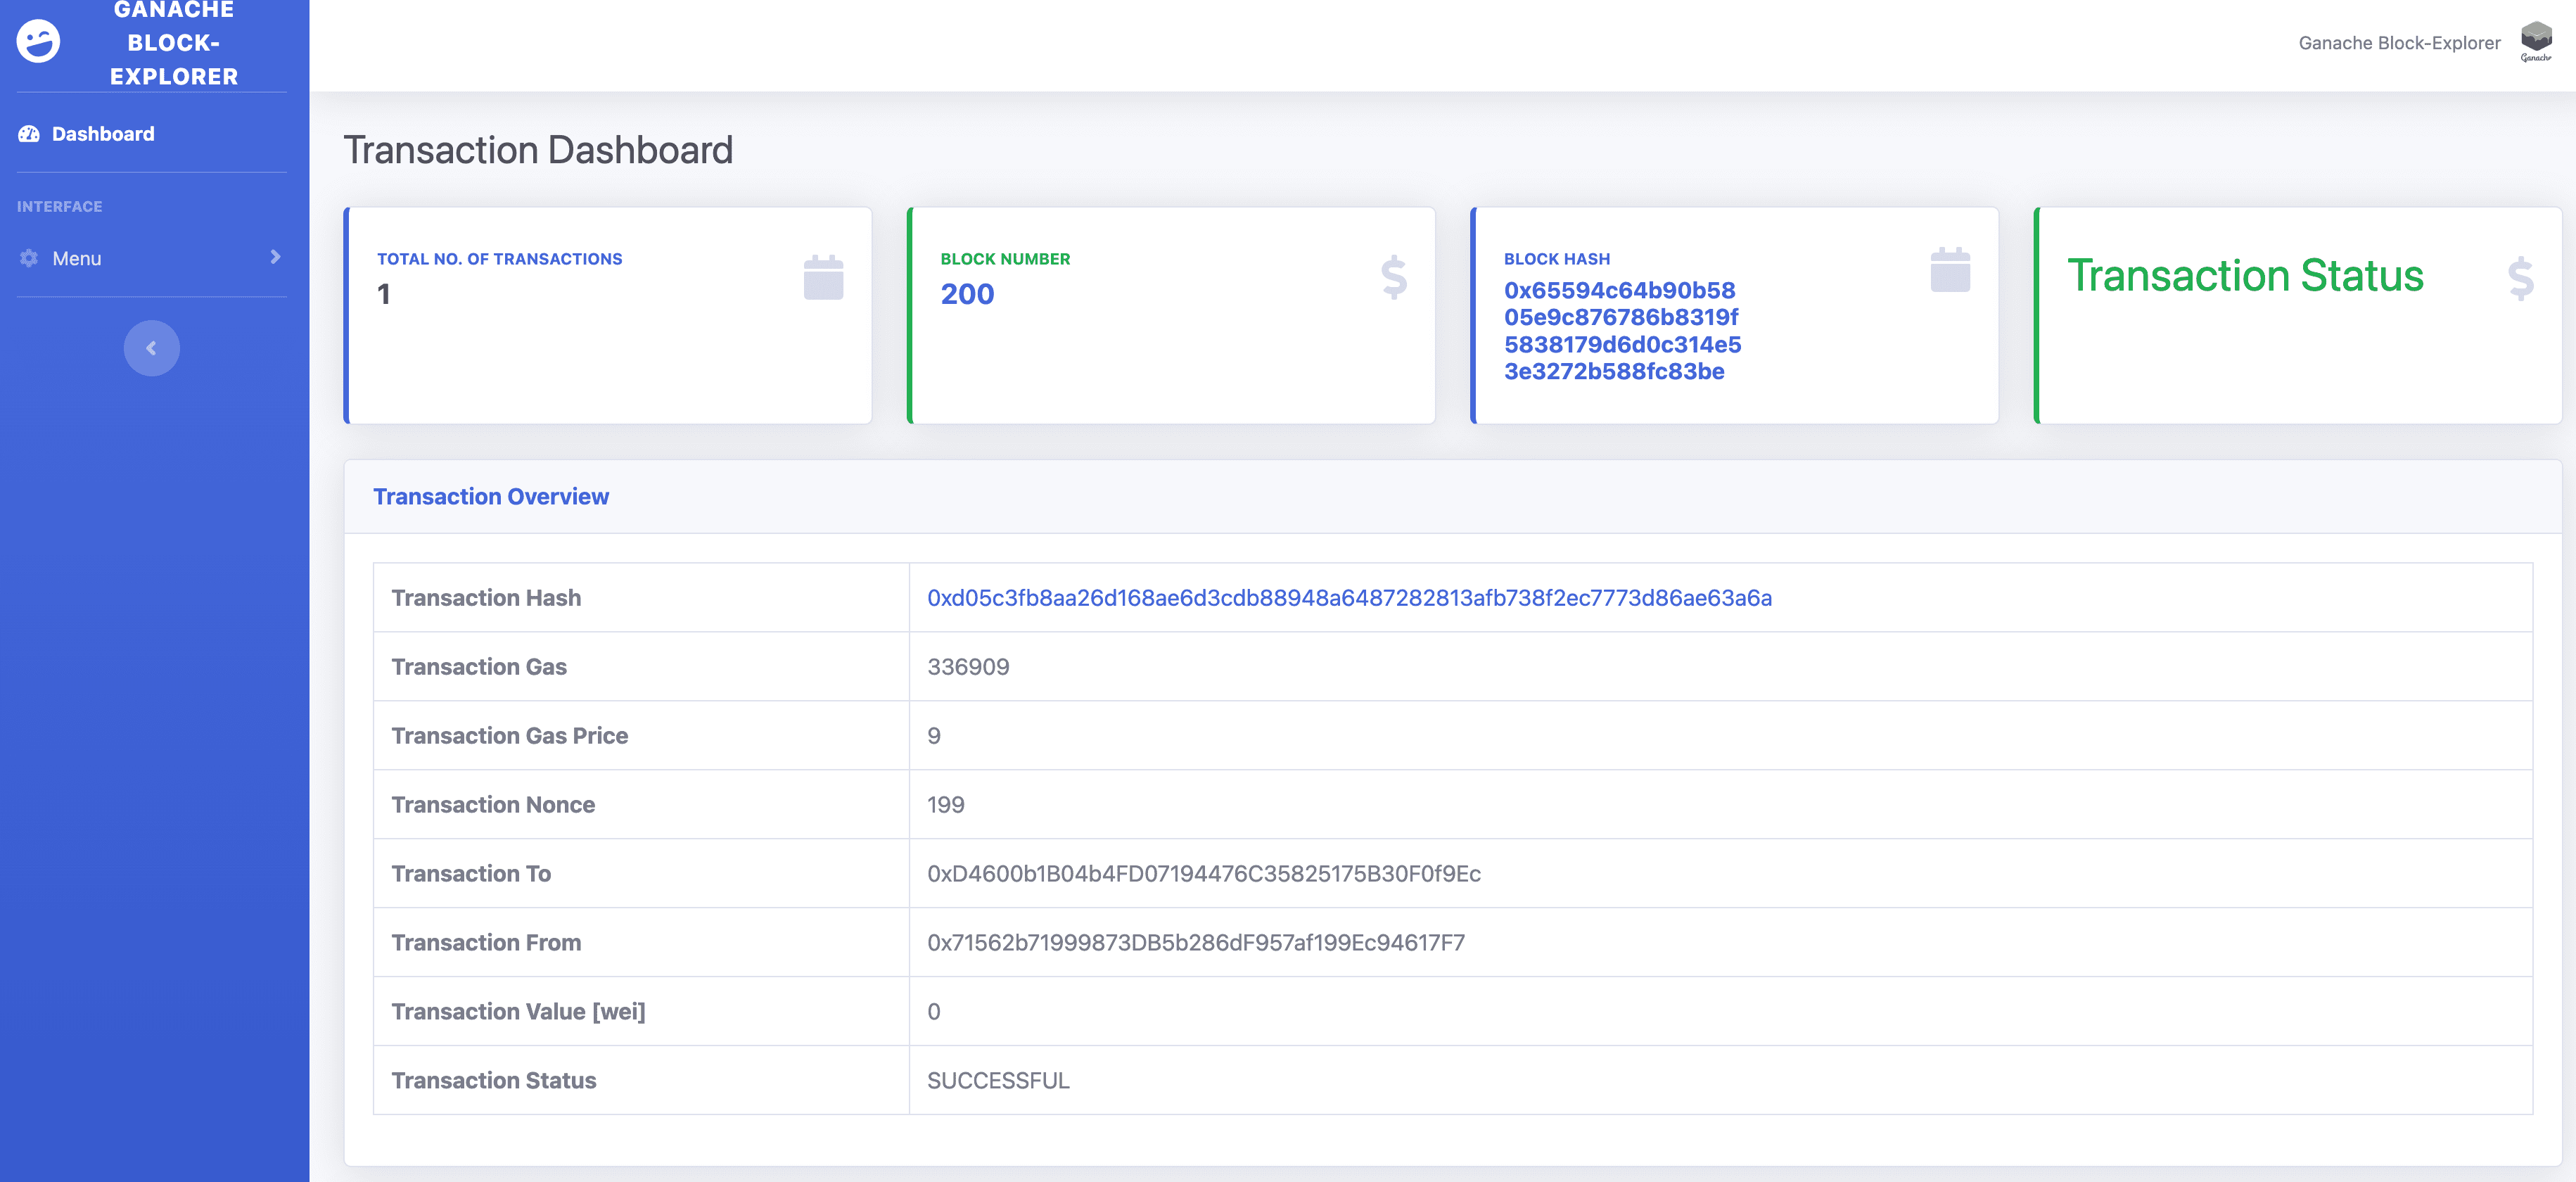
Note: This explorer is based on vivekganesan01/ganache-cli-block-explorer and includes additional features contributed by Casibase.
After installation and startup, you can access block details directly from the above address as the Browser URL in Casibase.